blah blah blah
7.05.2009
Type 3 (Safety-Inspected)
I spent a weekend disassembling and reassembling the front suspension, for the third time.
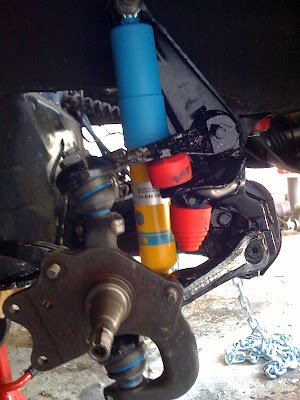
To get to the torsion bars: remove wheels, separate tie-rod ends, separate calipers from steering knuckles (do not disconnect brake lines), and unbolt dampers from lower arms. You can remove the entire brake-disk, steering-knuckle, ball-joint assembly, with the help of a floor jack by supporting the arm to release pressure on the ball-joint bolt.
WANTED: Peiseler VW 261 angle adjustment tool
I found the Peiseler VW 261 tool on thesamba.com for $200 in good condition. This is a tool that has several uses throughout the car, primarily among them adjusting the front and rear torsion bars to set vehicle ride height.
TODO: Get a torch, to free the torsion rods from the torsion arms.
The torsion arm and torsion bar had rusted together, which is why I couldn't finish the job last time. The torch handled one arm. The second arm, my buddy Darren's 5-ton press had met its match, it ended with twisted metal and a loud pop. And at last, I could apply my Peiseler VW 261.
TODO: Set front ride-height
Adjusted steering box and re-torqued all steering bolts.
Adjusted wheel bearing play.
Passed safety inspection.
(original post, 11 hours)
To get to the torsion bars: remove wheels, separate tie-rod ends, separate calipers from steering knuckles (do not disconnect brake lines), and unbolt dampers from lower arms. You can remove the entire brake-disk, steering-knuckle, ball-joint assembly, with the help of a floor jack by supporting the arm to release pressure on the ball-joint bolt.
I found the Peiseler VW 261 tool on thesamba.com for $200 in good condition. This is a tool that has several uses throughout the car, primarily among them adjusting the front and rear torsion bars to set vehicle ride height.
The torsion arm and torsion bar had rusted together, which is why I couldn't finish the job last time. The torch handled one arm. The second arm, my buddy Darren's 5-ton press had met its match, it ended with twisted metal and a loud pop. And at last, I could apply my Peiseler VW 261.
Adjusted steering box and re-torqued all steering bolts.
Adjusted wheel bearing play.
Passed safety inspection.
(original post, 11 hours)
Labels: volkswagen
2.25.2009
Re: Teardown
I measure the time spent on car projects in terms of afternoons. This project is to remove a VW type 4 engine from my Porsche 914 and rebuild it. Thus far, five afternoons.

Special-purpose tools required: 12-point 6mm allen wrench for the drive axle bolts, flywheel lock for removing clutch and flywheel bolts, 2-ton engine hoist.

Several missing parts, including the bottom right and left warm air guides (which cover the cylinder heads from below). Maybe they're not critical, but what about the thermostat. Where's the thermostat!? All I found was the thermostat roller:

- Remove rear hood and engine cover, exhaust and heating elements
- Remove air intake and throttle, disconnect fuel lines (label everything)
- Remove electrical connections, clutch cable, shifter, and starter motor
- Disconnect rear drive axles, remove engine and transmission
- Remove intake manifold and fuel ring, distributor, oil breather, alternator, fan and ducting
Special-purpose tools required: 12-point 6mm allen wrench for the drive axle bolts, flywheel lock for removing clutch and flywheel bolts, 2-ton engine hoist.
Several missing parts, including the bottom right and left warm air guides (which cover the cylinder heads from below). Maybe they're not critical, but what about the thermostat. Where's the thermostat!? All I found was the thermostat roller:
Labels: porsche, volkswagen
1.23.2009
Re: Front End Repair
To start with, the New York State Department of Motor Vehicles inspection determined my vehicle (a 1970 Volkswagen Fastback) to be un-roadworthy. The steering box, too much play. Ball-joint and tie-rod seals, broken. The front-suspension bump-stops, missing. The front suspension shock absorbers, completely worn. The brake calipers, mis-matched (one original with worn-out pad, one replacement with new pad, a smaller 1600-style Ghia/Beetle caliper). The fuel lines, cracked.

1. Remove the wheels, brake calipers, spindles. Disconnect outer tie-rod ends and ball joints. Disconnect speedo cable. Remove shock absorbers. Drain and remove fuel tank. Disconnect inner tie-rod ends. Disconnect steering coupler disc. Disconnect steering damper. Remove steering box with arm. Remove fuel pump. Remove body/axle bolt and deteriorated rubber body mounts. Remove the frame/axle cover bolts. Remove axle.

There are supposed to be four rubber bump-stops. Three were missing, and one of the bump-stop mounting posts was bent slightly upward. The upper torsion bar is designed with a tab which prevents it from coming out (it must be rotated 90 degrees and then removed), but the bent post prevented this one from coming out,

2. Grind Remove upper-left mounting post. Remove upper suspension arms and stabilizer bar. Remove lower suspension arm tabs. Remove lower suspension arms, torsion bars attached. Correct bend in suspeension post, add reinforcement welds. Weld new 3/8" mounting nuts into sections of 1" half-round steel pipe. Weld new mounting points on. Clean, de-rust and oil parts. Strip axle, prime and re-paint parts.

3. Make a list of replacement nuts and bolts. All new high-strength (10.9) metric bolts were used except as follows. Metric fine-thread high-strength nuts and bolts are nearly impossible to find in the U.S., so the original damper mounting bolts (12 x 1.5) and steering arm-to-knuckle bolts (10 x 1.0) were kept. The axle set-screws were kept. The steering gear to pitman-arm bolt is a grade 8.8, 12 x 1.5. The left-hand thread tie rod tightening bolts were kept. All other bolts were renewed.

4. Obtain new parts: replacement steering gear, replacement tie-rod ends and ball joints, replacement Red Urethane bump-stops. The left inner tie-rod end is a "No Longer Available" Type 3 part with a 9 degree bend, but a guy on thesamba, had them for $100, new steering gear, new steering coupler disc, new steering-damper rubber mount, new Bilstein dampers, new brake discs, two (correct) rebuilt brake calipers, new brake lines and hoses, new fuel hose and filter. I cut new hard urethane body mounts to match the new dampers. I buy most of my parts at Bughaus and Cip1. The shocks were from Jbugs.

5. Send fuel tank to nearest GasTankRenu to be sandblasted and re-coated.
6. Attach axle. Reassemble in reverse order. Bleed brakes. Set wheel alignment. Do-it-yourself wheel alignment. I saw this trick on the web: raise the vehicle and spin each front wheel, use spray-paint to paint a stripe around the wheels. Let the paint dry. Scratch a line into the stripe, by rotating the wheel against a sharp edge. Clip a tape-measure to two jack-stands, and measure the distance between the lines in the wheels, front and back. My new German dial-indicator from Pelican Parts and my iPhone calculator came in handy.
TODO: Set front ride-height. The ride is much too low, because I was unable to separate the torsion rods from the torsion arms.
TODO: Get a torch, to free the torsion rods from the torsion arms.
WANTED: Peiseler VW 261 angle adjustment tool. Helps you set the proper 17 degree angle for ride height.
NOTE: The front/lower torsion-arm retaining tabs are incorrect. Both are stamped for the same side.
TODO: find a correct opposite-side tab.
1. Remove the wheels, brake calipers, spindles. Disconnect outer tie-rod ends and ball joints. Disconnect speedo cable. Remove shock absorbers. Drain and remove fuel tank. Disconnect inner tie-rod ends. Disconnect steering coupler disc. Disconnect steering damper. Remove steering box with arm. Remove fuel pump. Remove body/axle bolt and deteriorated rubber body mounts. Remove the frame/axle cover bolts. Remove axle.
There are supposed to be four rubber bump-stops. Three were missing, and one of the bump-stop mounting posts was bent slightly upward. The upper torsion bar is designed with a tab which prevents it from coming out (it must be rotated 90 degrees and then removed), but the bent post prevented this one from coming out,
2. Grind Remove upper-left mounting post. Remove upper suspension arms and stabilizer bar. Remove lower suspension arm tabs. Remove lower suspension arms, torsion bars attached. Correct bend in suspeension post, add reinforcement welds. Weld new 3/8" mounting nuts into sections of 1" half-round steel pipe. Weld new mounting points on. Clean, de-rust and oil parts. Strip axle, prime and re-paint parts.
3. Make a list of replacement nuts and bolts. All new high-strength (10.9) metric bolts were used except as follows. Metric fine-thread high-strength nuts and bolts are nearly impossible to find in the U.S., so the original damper mounting bolts (12 x 1.5) and steering arm-to-knuckle bolts (10 x 1.0) were kept. The axle set-screws were kept. The steering gear to pitman-arm bolt is a grade 8.8, 12 x 1.5. The left-hand thread tie rod tightening bolts were kept. All other bolts were renewed.
4. Obtain new parts: replacement steering gear, replacement tie-rod ends and ball joints, replacement Red Urethane bump-stops. The left inner tie-rod end is a "No Longer Available" Type 3 part with a 9 degree bend, but a guy on thesamba, had them for $100, new steering gear, new steering coupler disc, new steering-damper rubber mount, new Bilstein dampers, new brake discs, two (correct) rebuilt brake calipers, new brake lines and hoses, new fuel hose and filter. I cut new hard urethane body mounts to match the new dampers. I buy most of my parts at Bughaus and Cip1. The shocks were from Jbugs.
5. Send fuel tank to nearest GasTankRenu to be sandblasted and re-coated.
6. Attach axle. Reassemble in reverse order. Bleed brakes. Set wheel alignment. Do-it-yourself wheel alignment. I saw this trick on the web: raise the vehicle and spin each front wheel, use spray-paint to paint a stripe around the wheels. Let the paint dry. Scratch a line into the stripe, by rotating the wheel against a sharp edge. Clip a tape-measure to two jack-stands, and measure the distance between the lines in the wheels, front and back. My new German dial-indicator from Pelican Parts and my iPhone calculator came in handy.
TODO: Set front ride-height. The ride is much too low, because I was unable to separate the torsion rods from the torsion arms.
TODO: Get a torch, to free the torsion rods from the torsion arms.
WANTED: Peiseler VW 261 angle adjustment tool. Helps you set the proper 17 degree angle for ride height.
TODO: find a correct opposite-side tab.
Labels: volkswagen
10.21.2008
Re: Front axle repair
4.24.2008
1970 Volkswagen Fastback

